

How To Add Mysql To Unreal Engine
MySQL Integration for UE4
MySQL Integration is a plugin that lets you connect your UE4 project to your MySQL server, and store and retrieve data from the server via SQL queries, directly from the Blueprint. This plugin brings the power of C#.NET in Unreal Engine 4.
If you take worked with SQL, you must be very familiar to Select, Update, Insert and Delete SQL queries, joins and sub-queries. If you know C#.Internet, and worked with ADO.Net, y'all must be knowing how to set up Connexion properties for your Server, and how to write and execute your SQL Queries within your .Net applications.
But at present you tin utilize Blueprints in Unreal Engine 4 to do your task. You are still writing the same queries that you are familiar with, merely here you are writing it within Blueprints, which gives yous flexibility to store and call up data equally well as Images from your MySQL Server to your UE4 projects.
Get It Here
Features
![]()
Asynchronous Connection
Asynchronously connect your Server via MySQL Server Authentication Arrangement.
![]()
Piece of cake Query Germination
Class your ain query and laissez passer as string input , directly within your Blueprint or C++ class.
![]()
Custom ConnectionString
Create custom connection cord format with different protocols and other connection parameters, every bit required past your server.
Getting Started
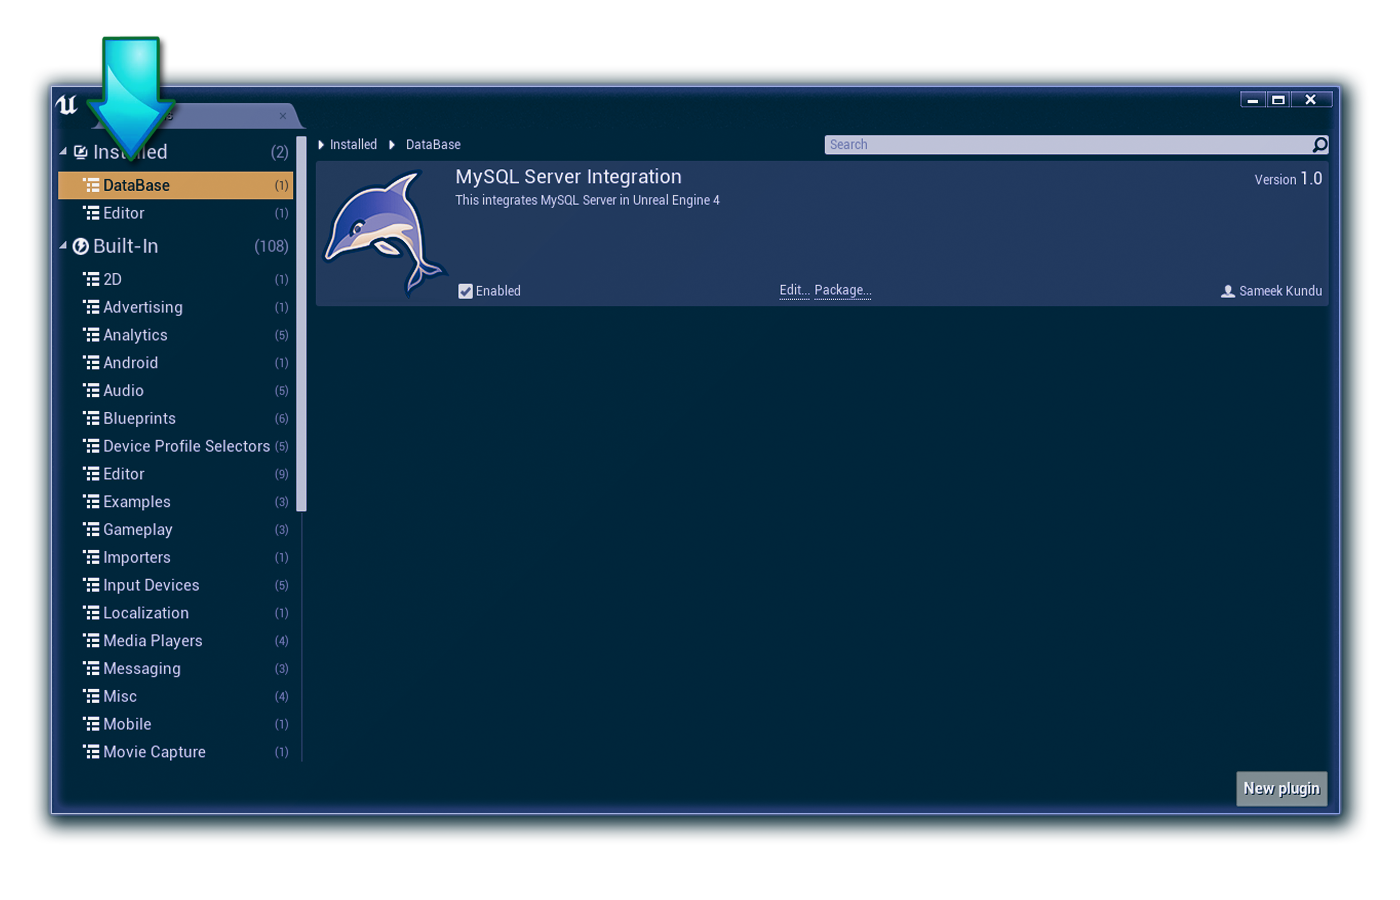
To get started, create a C++ based projection, download the plugin from the marketplace, and ensure that the plugin is installed, by visiting the Plugin Window, equally shown below:
Before we begin writing our SQL queries and executing them in our database, nosotros commencement need to prepare a connection within UE4. This is similar to how we manually connect to our DB Server using Windows or MySQL Server Authentication.
To set up a DB Connection, we either need to use Windows Authentication mode or MySQL Hallmark manner.
-
Windows Hallmark mode authenticates users to use the Database server via Windows Login ID and Password.
Function Name Description Get Current User This function returns the current Windows User Name. Get Current Domain This part returns the electric current PC Domain. Authenticate User This function takes the current user name, domain and password for your Windows account equally input and returns the authentication result as a Boolean variable. Delight note that this part will non work if the current Windows user does not require any password to login. So you may desire to avoid using this function unless absolutely necessary. -
MySQL Authentication mode uses logins that are created and stored in MySQL Server and are not based on Windows user accounts. Hither you demand to explicitly enter both your MySQL Server ID and password, while setting up the connection property. To learn near Authentication modes in item, you can refer here : https://dev.mysql.com/doc/refman/five.5/en/hallmark-plugins.html
Connection to the MySQL Server happens asynchronously. To connect to your server, beginning you need to call the Set Connection Backdrop function, and and so add a custom tick issue that you lot need to listen to at every tick to validate the electric current status of your connexion
-
The function Set Connexion Properties takes the necessary parameters that your server is going to need , and asking for the connection to be established.
Inputs Clarification Server This parameter takes your server address. DBName This parameter takes the name of your database. UserID This parameter takes your login ID. Password This parameter takes your login Password. Extra Param This parameter takes any extra setting that you might want to add together. All individual settings should exist seperated by semicolon and passed as a unmarried cord. Is Trusted If you are using Windows Authentication Way , you tin can check this, and you lot do non need to enter your User ID and password in that case. Otherwise, uncheck this paramter. 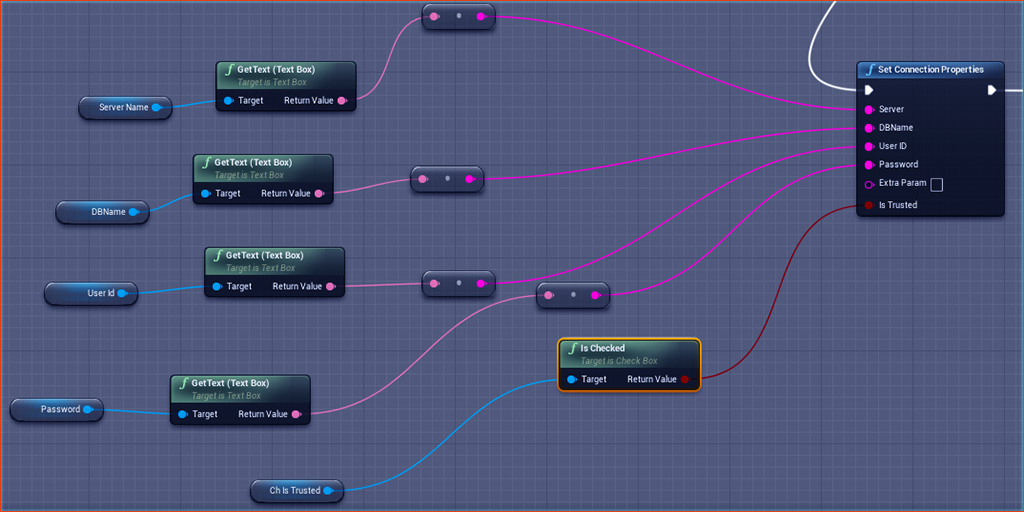
A connection cord typically looks like:
Server=myServerAddress;Database=myDataBase;User Id=myUsername;Password=myPassword;
So if your connectionstring consists of extra parameters , apart from the usual parameters included in the Set Connection Properties function(Server , DBName , UserID , Countersign , IsTrusted) , y'all can enter those actress parameters in the Extra Param input, seperated past a semicolon. For instance , if your connectionstring is something similar :
Server=myServerAddress;Database=myDataBase;Uid=myUsername;Pwd=myPassword;Protocol=pipe;PipeName=mypipename;
So y'all need to enter , in your Extra Param input :
Protocol=pipage;PipeName=mypipename;
It must be noted here that you can plain enter the extra parameters in other inputs too, similar in your Server input , you tin too write like this :
myServerAddress;Protocol=pipe;PipeName=mypipename;
But it is recommended to apply Extra Param input for this purpose, just to avoid confusion.
To learn about various types of Connection String and forming the one that best suits your requirement, you lot can refer here : https://www.connectionstrings.com/mysql/
-
Once your connection has been established, y'all need to periodically mind to the function Check Connexion Land to observe out the electric current country of your connection. An useful way to do that in Blueprints is using Gates, which is called in Tick function , but is opened after Gear up Connexion Backdrop is called.
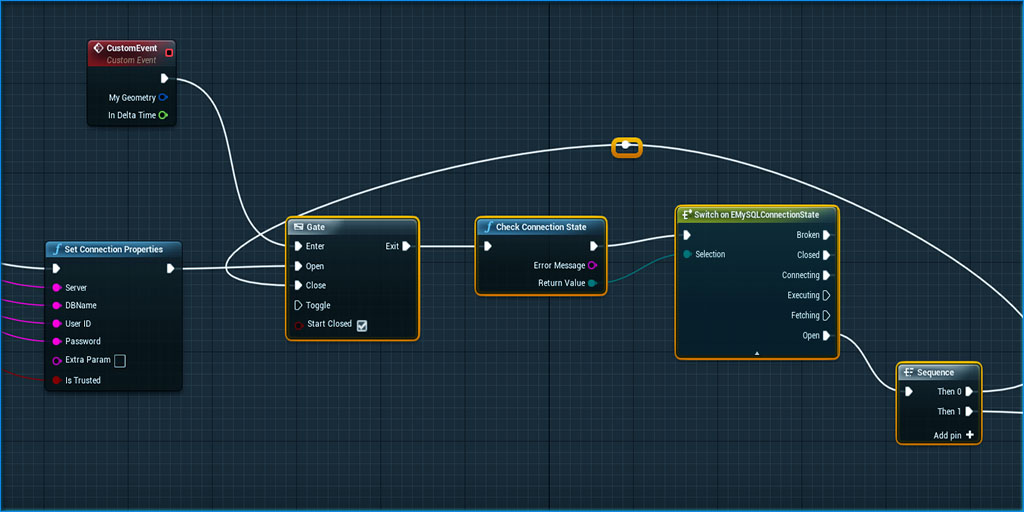
Connection Country Description Broken The connection to the information source is broken. Airtight The connection is airtight. Connecting The connection object is connecting to the data source. Executing The connection object is executing a command. Fetching The connection object is retrieving data. Open The connexion is open up. Equally long as the current country shows Connecting, you can execute other operations, and let the connection happen in the background. When you go current country as Open, this means connectedness is successfully established , and now you lot tin keep with executing queries in your database.
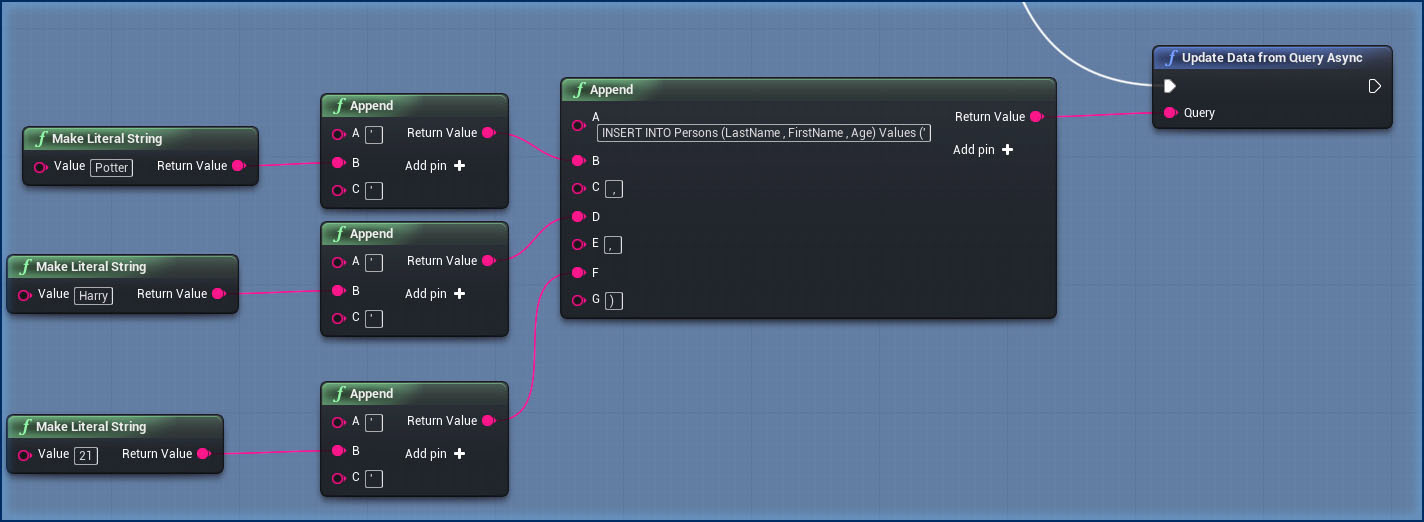
Once the connection property has been set up, you lot can now first forming your SQL queries. Forming queries tin can exist categorized in ii types, queries that update data to the database (INSERT, UPDATE, DELETE), or the queries that fetch data from the database (SELECT). We will discuss these two categories i past one.
-
To asynchronously modify data in our table , we will use the role Update data from Query Async.
-
After calling the Update function , you need to periodically listen to the role Check Query Execution State to find out the current country of your function. Here likewise you tin apply Gate within the Tick function, which should be opened later Update information from Query Async is chosen.
Query Execution State Description Executing The query is still being executed. Success The query has been successfully executed. Failed The query execution has failed. This generates fault message equally string output in the Check Query Execution State office.
If you would like to update information synchronously, you tin can call the function Update data from Query which takes a cord input where we have to enter our query and executes the query in the database.

-
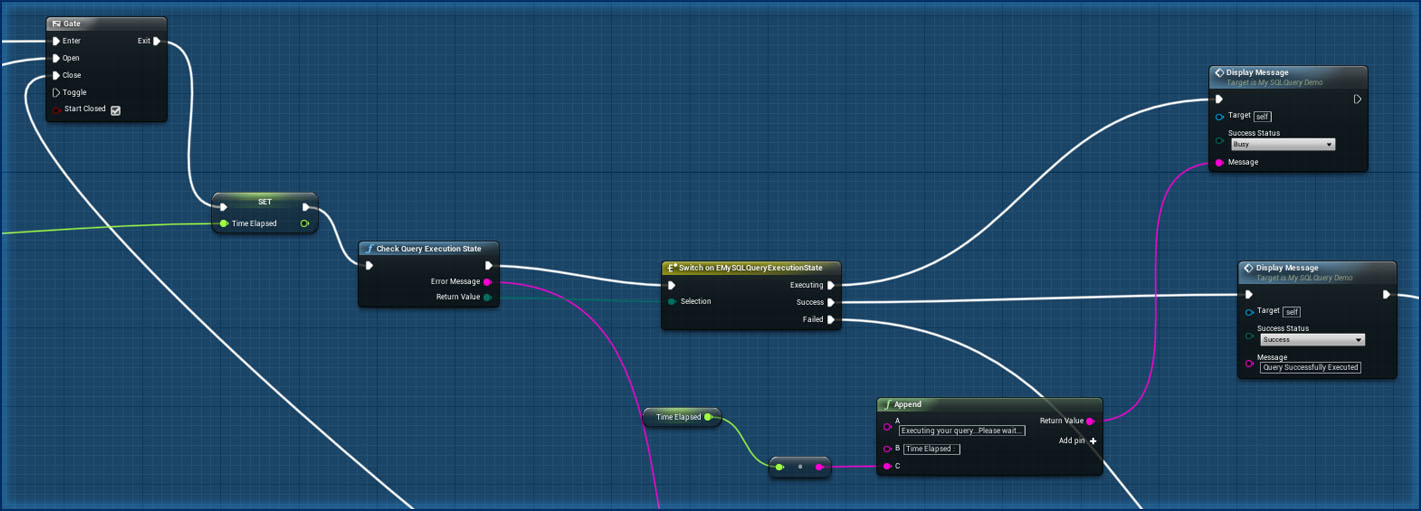
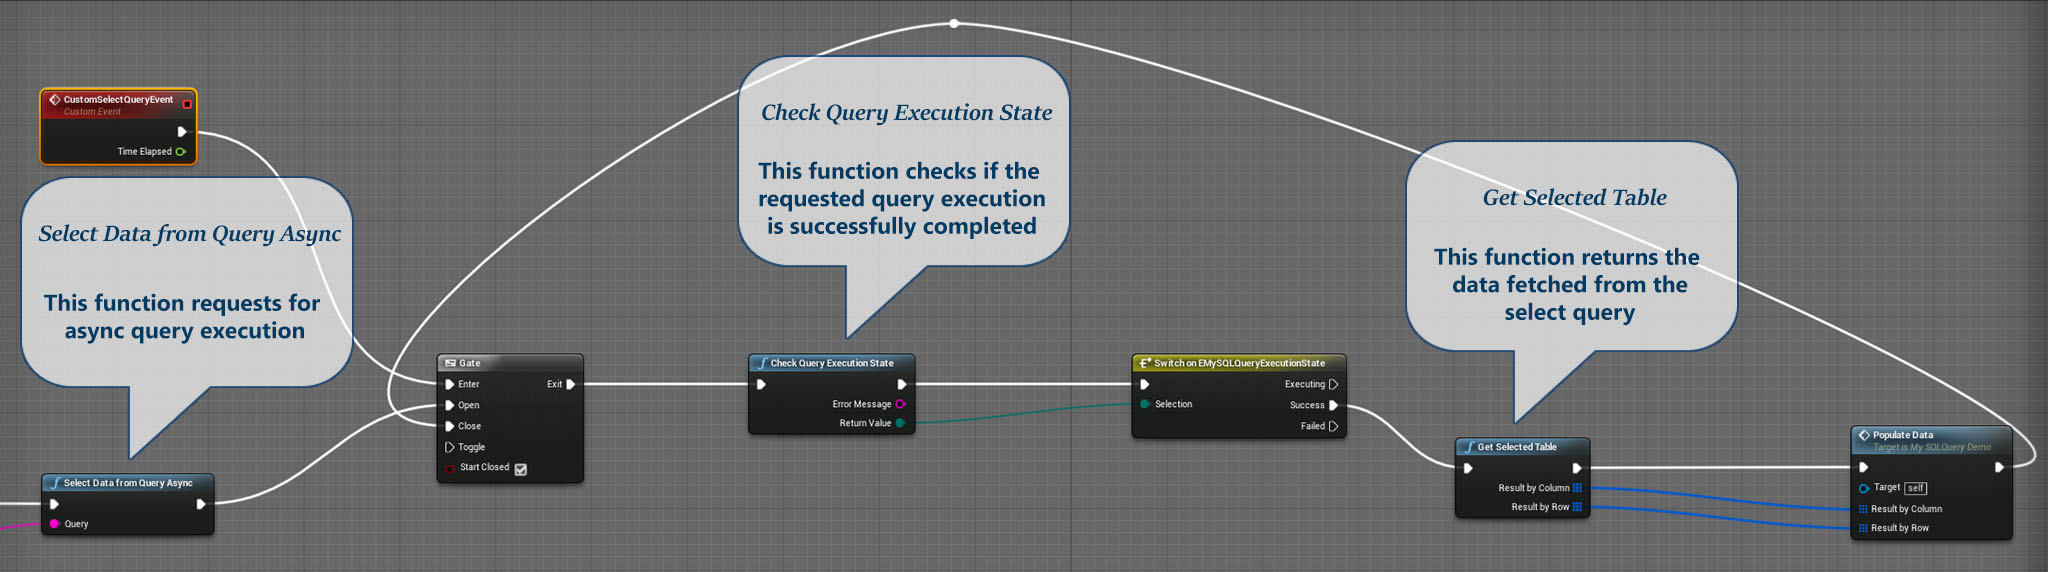
To select data asynchronously, you demand to offset call the function Select Data from Query Async which takes a string input where we accept to enter our query and fetches the effect from the database.
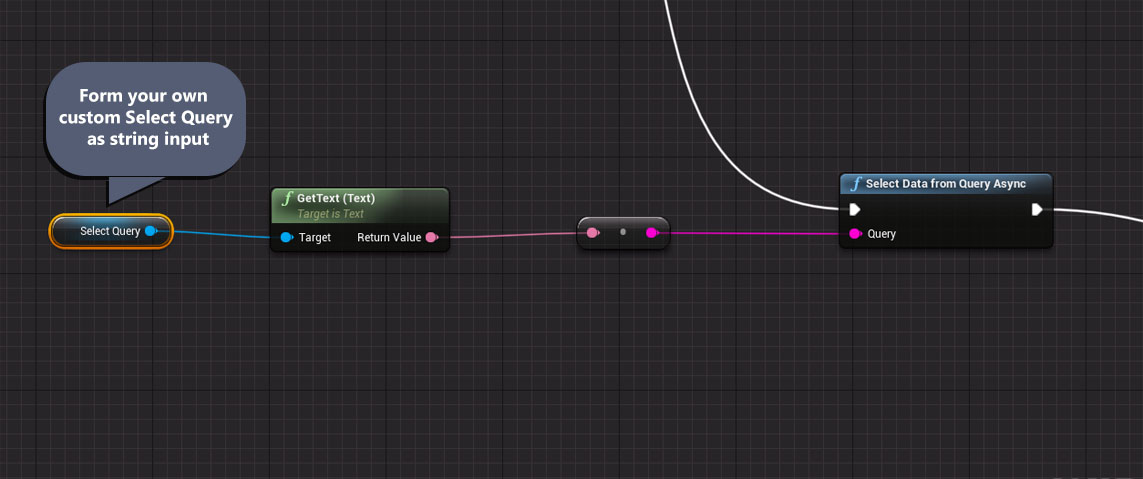
-
One time you lot called Select Data from Query Async, you lot demand to periodically mind to the function Check Query Execution State to observe out the current state of your query execution.
-
To select the data once the query execution is successful, phone call the role Get Selected Table.
Output Proper noun Description Effect Past Column This volition return an array of structured variable called MySQLDataTable. This represents a cavalcade in the tabular array and contains two backdrop, ColumnName and ColumnData.
ColumnName
ColumnName contains the header name of the column of the current instance of our initial array that we get past executing our select query. If you desire to display information of a specific column, you can use this variable to friction match the column proper noun.
ColumnData
ColumnData is an assortment of string consisting of all the elements of a given column. So you can easily gear up up a for-loop hither to become all the elements of a particular column iteratively.
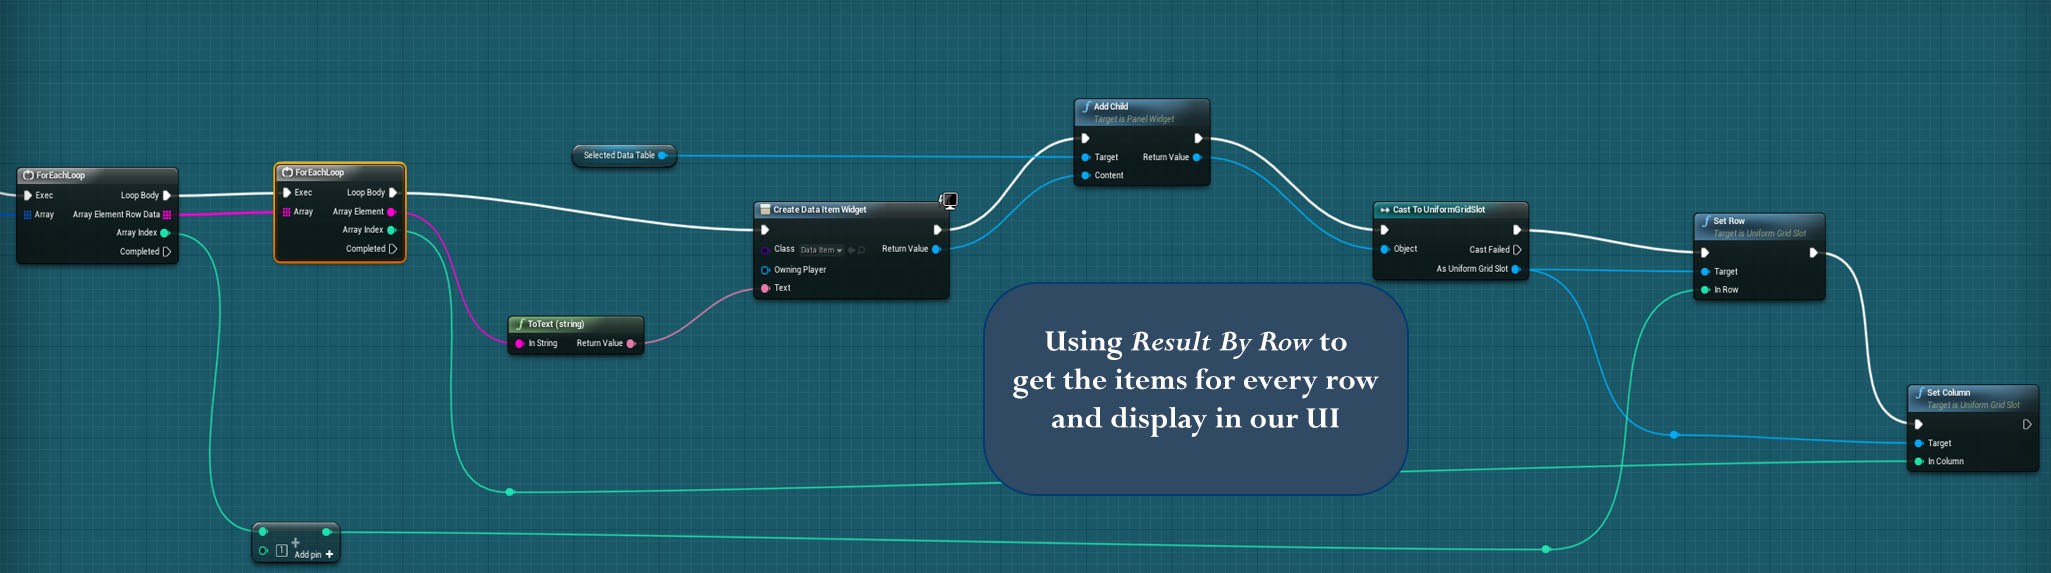
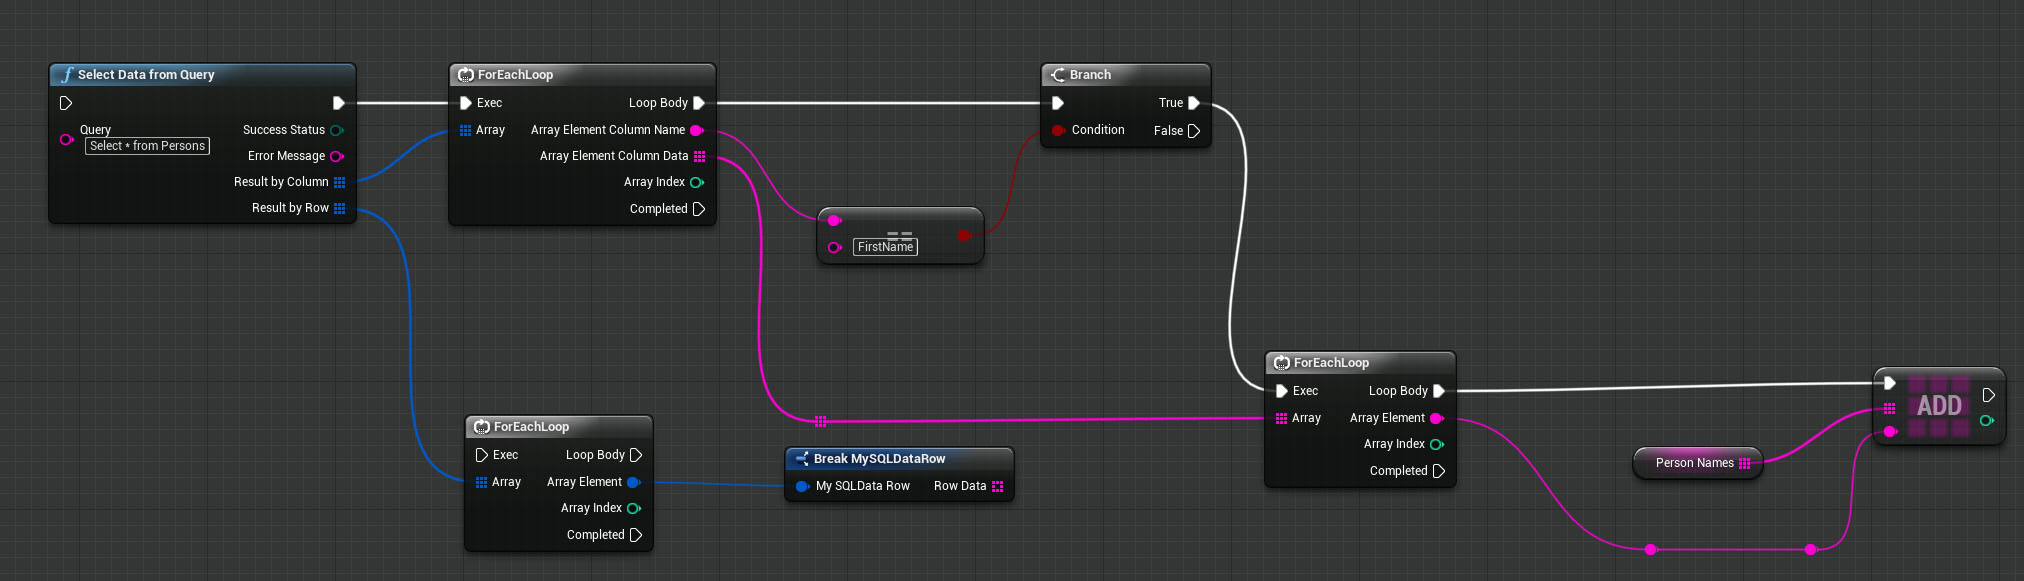
Event By Row This contains an array of structured variable called MySQLDataRow. This structure contains an array of string that represents values of an entire row. So the number of elements in this string assortment equals number of columns, and number of elements in the Result past Row array equals number of rows in the output of the Select query.
Beneath images display an instance of how we can use Result By Row and Result Past Column structures to store and display selected data retrieved from the server to our UE4 UI, every bit function of UMG widget.

If you would like to select data synchronously, you can call the function Select information from Query which takes a string input where we have to enter our query , executes the query in the database. and returns the selected information as Result By Cavalcade and Upshot By Row format.
The Cease
Thank you for your time. I hope y'all find this plugin useful. For technical difficulties, feedback, suggestions, queries, kindly drop me a mail service at sameek4@gmail.com . I would dear to hear from you.

How To Add Mysql To Unreal Engine,
Source: https://sameek4.github.io/KodeSpire/Pages/MySQLIntegration.html
Posted by: bowenrusuremb.blogspot.com
0 Response to "How To Add Mysql To Unreal Engine"
Post a Comment