

How Do I Add Photos To Lightroom
An effective photo import workflow
Things you desire to continue in listen before you first the import process:- What import method are you going to employ?
- Are you going to support your imported copies?
- Do yous know where you want your photos to become/remain?
- Are in that location things like keywords or presets y'all want to employ?
- Have you created a filename template for the file-naming convention you desire to apply?
- Initiate the import. You can initiate an import in several ways, but zip happens without yous taking the first footstep.
- Select the photos you want to import. No thing where your photos originate, you have to cull which ones to import.
- Configure the settings to meet your input needs. Having answers to the questions at the start of this section allows you to speedily ready the Import dialog and click that Import button.
Initiating the import of photos into Lightroom
The Import dialog is the gateway all photos have to pass through. You can open up the door in several means:- Click the Import push button in the Library module. This method might exist the most common mode to launch an import because the large Import button in the Library module is easy to spot (and who doesn't love to click a button). It tin be used when importing from any disk or device.
- Connect your photographic camera or a memory card to your estimator. If you enable this feature in Lightroom Classic's Preferences file ahead of fourth dimension, the Import dialog automatically launches whenever it detects the presence of a retention card — either solo or as office of a digital camera. This can be a real time-saver if the only time you lot connect a camera or retentiveness carte du jour is when you want to conduct a Lightroom Classic import.
- Choose File→Import Photos and Video from the master menu. Apply this option if you're importing files from a memory card or those already on your difficult disk.
- Drag and drop. Y'all can drag and drop a folder of images from your file browser correct onto the Library module to start the import process.
Selecting the photos yous want to import into Lightroom Classic
Although information technology may exist true in most cases that you'll want to import every photograph on the retention card, it's still worth your while to scan through the images to verify that you really desire to import them all. The Don't Import Suspected Duplicates pick on the File Handling panel is checked by default to ensure that you don't import the aforementioned photos twice, but when scanning the previews, you might find you simply don't demand to waste time importing some of the (bad) photos. Uncheck the check box on any photos that you lot don't want to import at that time.In some instances, you lot may notice it easier to click the Uncheck All button at the bottom of the dialog and then simply cheque the boxes for photos you lot exercise desire to import. Y'all tin use faster methods to sort the wheat from the chaff in the Library module, only there's no need to import photos of the inside of your lens cap.
Configuring the settings to run across your input needs
When you know which photos yous desire to import, it'southward time to make choices regarding how they're imported and whether you're going to multitask a little and process them on their way in the door.The Import dialog gives you four options along the summit centre. The source yous are importing from largely determines which options are available in the Import dialog.
If you are importing from a retentiveness carte, Copy as DNG and Copy are the but available options. If y'all are importing from a bulldoze all options, Copy as DNG, Copy, Motility, and Add together are available.
Here'south why. If y'all're importing from a device (say, a memory carte), you don't want the Add selection because memory cards are simply temporary storage devices. Lightroom Classic knows this and disables the option. Motion also isn't an pick, based on best practices for dealing with memory cards.Outset, y'all don't want to remove files from your retentiveness card until you tin can visually verify that the files have been copied safely to at least one other deejay (2 if you lot want to be safe). The idea hither is that you don't want to risk something going wrong in the moving process considering y'all haven't all the same created a backup.
2nd, information technology's better to use your camera to reformat the card when yous're ready to erase the contents than information technology is to let your computer perform that task. When yous reformat the carte du jour in-photographic camera, the process is done in the all-time mode for the photographic camera, which means you experience less chance of corrupted data when the photographic camera is writing files to the card in normal functioning.
The Copy and the Move file-handling options include additional settings not found when using the Add option. The reason for this is that when you're just adding, you aren't changing anything about the photos. You're but telling Lightroom Classic where the files are located and getting on with the business of importing their data. It would follow that if you're choosing to copy or move the photos and then import, you would need to tell Lightroom Classic where y'all want them to go and whether you want to change their names in the process.
To that terminate, when y'all cull one of the Copy or Move file-treatment options, you run into the following options announced in the Import dialog:
- Destination: Even though this pick appears at the lesser of the Import dialog, I'm talking near it first because information technology is the near important. You lot exercise two things here: select the destination where the photos volition go and control the folder structure that is created in the import procedure. You can choose 3 Organize methods:
- By original folders: This option is useful when you're moving or copying from a disk and want to replicate the same folder structure on the destination disk.
- By appointment: The is the default option. Lightroom Archetype provides eight date-based folder structures (YYYY/MM-DD, YYYY/Month/DD, then on) to cull from. The capture dates from the photos are used to create the actual dates used, which is reflected in the space below the Organize field. The slash separating some of the date options means a folder and subfolder construction volition be created.
- Into ane folder: This choice allows you to put all your photos into a single binder without regard for dates or original folder structure.
- File Renaming: Provides the option to modify the filenames when placed in the destination folder. Choose Filename from the Template drop-downwardly carte if you want the filenames to continue the original names. An case of how the filenames will look is displayed above the Template field, using the selected template.
Lightroom Archetype's file-renaming function is quite powerful and versatile. It's a great option to accept during import, but keep in heed that you tin can rename files later in the Library module. And then, don't feel pressure to do it at import.
Lightroom Classic installs with a number of prebuilt filename templates for you to use, but its true power is unleashed when you apply the Filename Template Editor, as shown, to create your custom templates. Y'all access the editor by clicking the Template drop-down menu and choosing Edit. 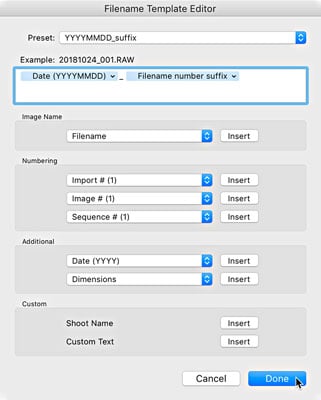 The Filename Template Editor.
The editor works past using what it calls tokens to represent various text strings that y'all can get together into diverse configurations. There are tokens for paradigm name information, image numbering options, date formats, metadata, and even custom text. The assembled tokens can be saved as reusable templates any time y'all want to rename files. (You'll utilise the same editor and tokens if you rename after import as well.)
Click through the various sections to get a sense of what data is possible to include in your filenames. Give your attention to two tokens in particular:
- Import #: Y'all tin can utilize this token to include the import number in your filename. The Import Number is managed from the File Handling tab of the Catalog Settings dialog box.
- Image #: You tin include this token when you desire to number files incrementally across multiple imports. Controlled by the Photos Imported value, Epitome # is managed from the File Treatment tab of the Itemize Settings dialog box.
Follow along this example in which you create a custom template that combines appointment information and function of the original, camera-generated filename (refer to the preceding figure to see what the template ends up looking similar):
- Click the Template drop-downward carte, and choose Edit.
Doing so launches the Filename Template editor. When the editor opens, notice that the active template displays in the Preset field at the superlative of the editor and that the tokens that make up that template appear in the Editing field. Take a moment to click through the other templates and see how the tokens are synthetic.
- Delete any tokens that appear in the editing field. Starting time with a clean slate. Simply click into the field behind the tokens and press Delete (Backspace for Windows). Notice the case higher up the field changes as you add together or remove tokens to preview how the filename will appear.
- Click the driblet-down menu in the Boosted section of the editor, and cull the Appointment (YYYYMMDD) token. Just selecting from the carte adds the token to the editing field.
- Click the editing field behind the appointment token and type an underscore.
You lot aren't limited to using just the tokens to build your filenames. You tin can type right into the editing field. Merely remember that with filenames, yous don't want to make them whatever longer than necessary, and you desire to avoid all nonalphanumeric characters except for dashes and underscores to prevent potential problems downward the road.
- In the Image Name section of the editor, choose the Filename Number Suffix token from the driblet-downwardly menu. This is the camera-generated file number.
- Click the Preset driblet-down menu at the acme of the editor, and choose Salvage Electric current Settings Every bit New Preset. Doing so opens the New Preset dialog. In case y'all oasis't noticed, the folks at Adobe apply the words template and preset interchangeably. Don't let that misfile you lot.
- Give the preset (template) a descriptive name, and click Create. After you click Create, you see this proper noun appear in the Preset bill of fare.
- Click Done. You're brought to the Import dialog with your new template selected.
- Develop Settings: While some prebuilt Develop settings are available to yous out of the box, I don't recommend using any at this point. Applying a Develop setting to all photos at import tin be helpful at times (such as when yous're shooting in a studio and want to utilize a custom white-rest setting), but the majority of your imports tin do without Develop settings — which means you should leave this set to None.
- Metadata: There's no reason non to apply a basic set of metadata to all imported photos. Create a preset (more on that later on) that contains your basic copyright and contact data, and apply information technology every time.
- Keywords: Keywords identify your photos and — when used consistently — provide a powerful means to find specific photos after your catalog grows. It isn't a sexy attribute of the import procedure, but do it, and you'll reap the rewards. During import, you only want to be conscientious near getting too specific because the keywords you enter here are going to be applied to every imported photograph in the session.
To create a basic Metadata preset, you exercise the following:
- In the Apply During Import panel of the Import dialog, click the Metadata drop-downward menu, and choose New. Doing and then launches the New Metadata Preset dialog (see the post-obit figure).
- Enter a proper noun for your new preset in the Preset Name field.
- Fill out all the fields in the IPTC Copyright and IPTC Creator fields. This is the bones information near who holds the copyright to this photo and how to contact them. Adding it here means it's written into the metadata of your exported files and tin can exist written to the XMP metadata of your source files.
Here's how to create the (c) symbol so that information technology can be included in the Copyright field. If y'all are working in Windows and have a dissever number keypad, agree downward the Alt key and printing 0169 on the keypad, and and then release the Alt key. If y'all're on a laptop with a keypad overlay on your regular keyboard, hold down the function (Fn) key and the Alt key, and then printing 0169. If you're working on a Mac, hold down the Selection key and press G.
- Click the Create button. This saves the preset using the name you entered in Pace 1 and closes the Metadata Preset dialog. You come across the new preset in the Metadata field of the Import dialog.
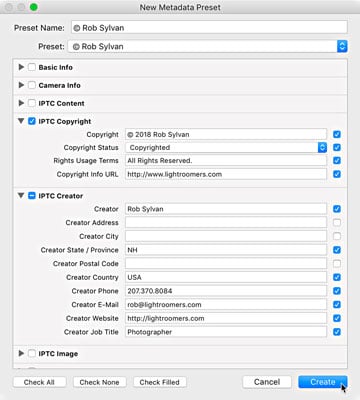 The New Metadata Preset dialog.
The concluding setting to configure earlier clicking the Import push is Build Previews in the File Handling panel. Lightroom Classic begins rendering the previews after the import process is complete. This setting determines the size of the previews information technology starts creating after import. Here are your options:
- Minimal: With Minimal selected, the everyman-resolution previews are grabbed from each file equally quickly equally possible. Lightroom Classic renders its previews every bit needed when you are working.
- Embedded & Sidecar: Some photos have a larger or total-size preview embedded inside their files (or their companion metadata files). With this option, that preview is grabbed first, which may provide higher initial quality viewing over what yous run across if you choose the Minimal option. This is a bully option for a fast import with the ability to bank check focus and split the keepers from the deletions. I use this option well-nigh all the time.
- Standard: This setting tells Lightroom Classic to go ahead and offset rendering standard-sized previews based on those settings for all recently imported images.
- 1:i: This is a full-size, pixel-per-pixel preview of the source file that Lightroom Archetype displays when you are viewing photos upwardly close in the Library module. With this option is set, Lightroom Archetype doesn't wait until i:1 previews are needed; instead, Lightroom Classic starts rendering them after the import is consummate.
No matter which setting you apply, Lightroom Classic however eventually renders the previews information technology requires when needed. The main purpose of the setting is to requite you a little control over this background procedure that happens subsequently the import is complete. I routinely choose the Embedded & Sidecar selection.
Importing your photos to Lightroom Classic
The two almost common types of imports yous perform are the Add together (especially for new Lightroom Classic users) and Re-create variants.Importing from a bulldoze (Add)
For photos on your hard drive that y'all desire to manage with Lightroom Classic, but go on them right where they are on your difficult drive, you utilise the Add method. Here are the steps for adding existing photos to the catalog:- Click the Import button in the Library module to open the Import dialog. Note: To get to the Library Module, press M (for Filigree) from anywhere in Lightroom Classic.
- In the Source panel, navigate to the height-level folder that contains your photos and select it, making sure that Include Subfolders is checked.
- Click the Add button.
- Leave all photos checked for import.
- You can use Lightroom Classic's tools later to sort out and delete whatsoever less-than-perfect photos.
- In the File Handling panel, set Build Previews every bit desired.
- In the Employ During Import panel, set the Develop Settings drib-down menu to None, and choose your Metadata preset in the Metadata menu.
- Employ any globally applicable keywords (hundred-to-one that any would apply to all photos when you lot're first importing).
- Click the Import button.
Importing from a memory card (Copy)
Use a bill of fare reader instead of direct connecting your camera. A card reader is inexpensive and portable, doesn't bleed your photographic camera batteries, and frees your camera to have more than photos if you accept multiple memory cards. Card readers oftentimes provide a faster data transfer rate than most cameras practice. Card readers are so common these days that many laptops and monitors accept them built right in!Fourth dimension to go through the steps for importing from a memory card — no matter how you connect the card to the calculator. These steps are for the manual method and piece of work merely if you lot disable the Prove Import Dialog When a Memory Card Is Detected preference setting:
- Connect your retentivity carte to the estimator, and click the Import button in the Library.
- Verify that your retentivity card is selected in the Devices section of the Source panel.
- Ostend Eject after Import in the Source panel is checked.
- Scan the previews, and uncheck whatsoever photos you don't want to import.
- Choose the Copy option at the top of the Import dialog.
- Go right to the Destination panel, and choose where you want the new copies to exist saved.
- Click the Organize drop-down in the Destination panel, and choose how you want the photos organized.
- Ostend that Don't Import Suspected Duplicates in File Handling is checked.
- (Optional) Check the Brand a 2d Copy To box in the File Handling panel, and configure a backup location.
- Prepare Build Previews equally desired.
- In the File Renaming panel, choose a file-naming template from the Template drop-down card.
- In the Utilise During Import panel, click the Develop Settings drop-downwardly carte du jour, and cull None.
- While you are in there, click the Metadata driblet-downwardly carte du jour and select an existing preset or create a new one.
- Utilize any globally applicable keywords.
- Double-check settings in the Destination panel.
- Click the Import push.

How Do I Add Photos To Lightroom,
Source: https://www.dummies.com/article/technology/software/adobe-products/lightroom/how-to-import-your-photos-into-adobe-lightroom-classic-264689/
Posted by: bowenrusuremb.blogspot.com
0 Response to "How Do I Add Photos To Lightroom"
Post a Comment